Activating USB Debugging on your Android device gives you more control and access for development, diagnostics, and troubleshooting.
It allows your smartphone to communicate with a computer for advanced functions like ADB commands or software testing.
This mode is especially useful if you’re a developer or trying to recover data. In this guide, you’ll learn everything you need to enable it safely and use it when needed.
What Is USB Debugging Mode?
USB Debugging is a developer feature on Android devices that allows your phone to interact directly with a computer. This connection helps with advanced tasks like issuing ADB commands, transferring files, or flashing firmware.
It’s disabled by default to prevent security risks from unauthorized access. When enabled, it allows full read-write access from a connected PC using developer tools.
USB Debugging is located under Developer Options. You need to enable Developer Options first to access it.
When Should You Use USB Debugging?
USB Debugging isn’t for everyone. You only need it if you’re planning to perform development tasks or access system-level functions.
If you’re installing a custom ROM, recovering a bricked device, or using tools like Android Studio, you’ll need it on.
It’s also useful for transferring files when your screen is broken. However, keep it off if you don’t need it daily. Leaving it on can expose your phone to risks if connected to an unknown PC.
How to Enable Developer Options on Android?
Before you can activate USB Debugging, you need to unlock Developer Options. This is a hidden menu intended for developers, but it’s easy to enable. You won’t need third-party apps or root access. Here’s how to do it on any Android device:
- Open your phone’s Settings.
- Scroll down and tap About Phone.
- Find and tap Build Number seven times.
- Enter your phone’s PIN or password if prompted.
- You’ll see a message: “You are now a developer!“
- Return to Settings and look for Developer Options under System or Additional Settings.
How to Activate USB Debugging?
Once Developer Options are visible, you can toggle USB Debugging directly. This gives your PC access to your phone’s deeper system features.
Only enable it when you’re sure you trust the connected computer. Follow these steps to activate it correctly:
Step-By-Step Instructions:
Follow these steps exactly to avoid confusion or missing the correct setting.
- Go to Settings > System > Developer Options.
- Scroll down until you see USB Debugging.
- Toggle the switch to enable it.
- Confirm the pop-up message asking if you want to turn it on.
- Once enabled, your computer will detect the device when connected.
- Always unplug the USB when not using debugging.
Important Notes and Warnings
USB Debugging comes with power, but also risks. If you leave it on and your device gets into the wrong hands, someone can manipulate your data. For this reason, it’s recommended to keep it off when not in use.
Enable it only when needed for specific tasks. Some apps or malware may misuse the permission if USB Debugging is left active. Be cautious, especially when using public or shared computers.
How to Disable USB Debugging?
Turning USB Debugging off is simple and important when you’re done using it. Keeping it off helps protect your device from unauthorized access. Here’s how to disable it properly after you finish your tasks:
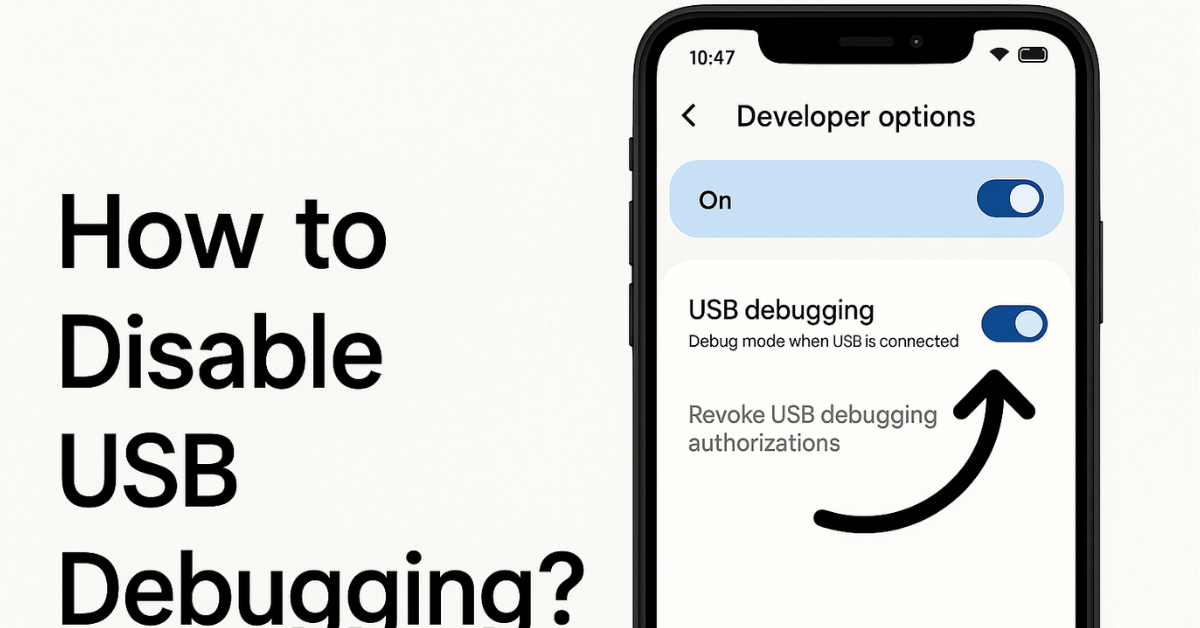
- Go back to Settings > Developer Options.
- Find USB Debugging in the list.
- Toggle the switch to turn it off.
- You can also disable Developer Options entirely by toggling it off at the top of the screen.
- Once off, the system won’t accept commands from connected computers.
- Your phone is now in a more secure state.
Common Issues and How to Fix Them
Sometimes USB Debugging doesn’t work as expected. Either the device isn’t recognized, or the option is missing. Below are common problems and quick solutions to keep things running smoothly:
USB Debugging Not Detected by PC
This issue usually means your device isn’t communicating correctly with your computer. Before you panic, check for common mistakes that block detection.
Try the following solutions to reestablish the connection:
- Use a high-quality USB data cable—not just a charging cable.
- Make sure your phone is set to File Transfer (MTP) mode.
- Install proper drivers for your device or use the Google USB Driver.
- Try using another USB port or a different cable.
- Restart both your phone and computer before reconnecting.
- Check if USB Debugging is still turned on.
USB Debugging Option Greyed Out
If the USB Debugging toggle is greyed out, it means your device has restrictions or limitations blocking access. This can happen due to system policies or manufacturer settings.
Here are steps to troubleshoot and unlock the option:
- You might be using a work profile or restricted user account.
- Some manufacturers lock down Developer Options.
- Try clearing Developer Option settings and enabling it again.
- Reboot your device to refresh system settings.
- A factory reset may be needed as a last resort if nothing works.
- Always back up data before attempting a reset.
Extra Tips for Advanced Users
There are additional tools for those who need more than just enabling USB Debugging. These tools give you greater control over your Android device.
You can record your screen, transfer APK files, or mirror your display. Here’s what else you can do once USB Debugging is active:
- Use ADB Commands to uninstall apps, sideload updates, or access logs. See official ADB command list.
- Pair with tools like scrcpy or Vysor to control your phone from your PC.
- Perform full device backups through command-line tools.
- Install custom recovery tools like TWRP if your device is rooted.
- Access advanced settings not available through the standard interface.
- Always be cautious when modifying anything beyond your skill level.
Using ADB Without USB Debugging
Sometimes, USB Debugging may be inaccessible, especially if the phone screen is broken. In such cases, users can enable ADB over Wi-Fi if the device has previously accepted debugging.
Another way is through OTG adapters with a mouse to navigate and enable the setting. This is useful during data recovery or device troubleshooting.
However, this method requires prior access or trusted device authorization. Without that, it’s impossible to use ADB without physical access.
Developer Options Overview
USB Debugging is only one of many features inside Developer Options. Other valuable tools include Stay Awake, OEM Unlocking, Background Process Limit, and Pointer Location.
Each setting can affect performance, battery life, or system behavior. You should explore these options carefully and avoid changing settings you don’t fully understand if you are unsure.
USB Debugging on Different Android Versions
The steps to enable USB Debugging may vary slightly depending on the Android version and phone brand. The menu structure of Samsung, Xiaomi, OnePlus, and Google Pixel is minorly different.

For example, some show Developer Options under Additional Settings, while others put it under System. The core steps remain similar. If in doubt, always check your device’s manual or support site.
Final Thoughts: Take Control, But Stay Secure
USB Debugging gives you advanced access to your Android device. It’s essential for development, recovery, and deep-level customization.
But with this access comes the need for caution. Enable it when needed and disable it when done to keep your phone secure.


